TO PAINT A TORTOISE
Several readers have suggested a post about my painting technique, and, ever the full-service blogger/confirmed pushover, I've chronicled my procedure on this recent acrylic painting, one of a series of commissions for "Vanishing Circles," a collection of artwork being assembled for the Arizona/Sonora Desert Museum depicting endangered flora and fauna of the region. The subject here is a Desert Tortoise (Gopherus agassizi). All of these images may be clicked on for closer scrutiny.

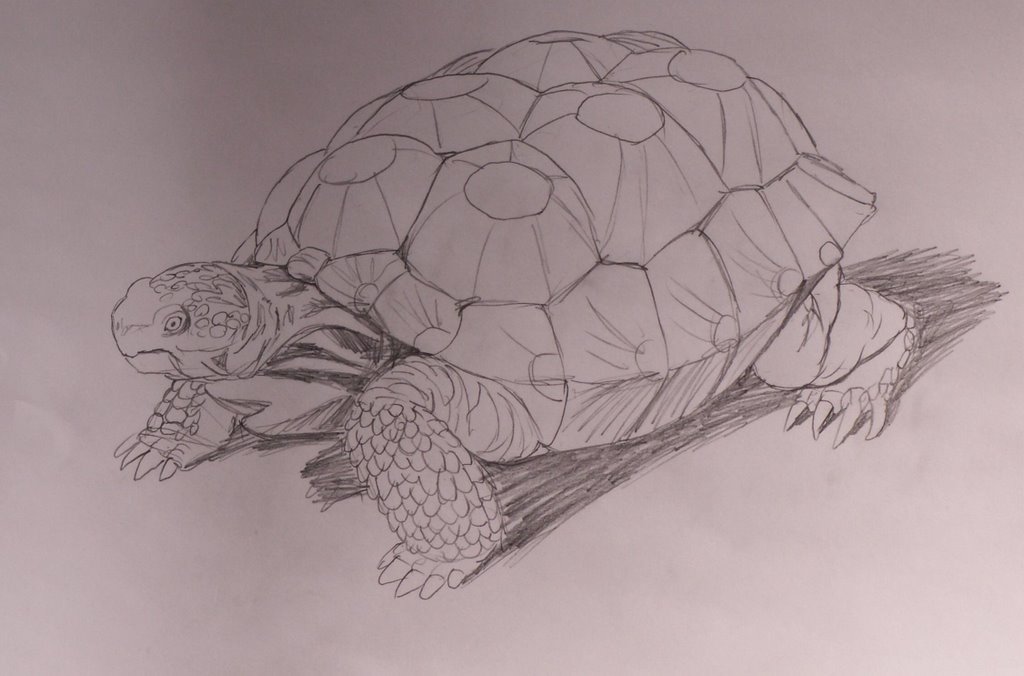
 Step one is executing a drawing - something I'm not terribly skilled at. I know a number of artists who can draw something worthy of Abrecht Dürer in a few short minutes. I'm not among them. I have to plan everything out. A drawing starts with a number of little thumbnail sketches, slowly refining things until I get something I'm happy with. A tortoise is an easy animal to draw, and this drawing was simple and straightforward. With a trickier subject, it's common for me to waste half a dozen sheets of paper refining thumbnails to figure out how to draw a single element.
 Once I've worked out how to draw the main subject, I put together a composition drawing. Here I've positioned a male Desert Tortoise preparing to charge an opponent. Our hero's head, where all the intent of the piece will lie, is centered on the page. His body occupies the upper-right quarter of the composition. A hedgehog cactus (Echinocereus sp.) behind him adds mass to that quandrant, suggesting an impending charge from the corner, diffusing that mass into the relative empty space before it. The dark carapace in the opposite corner creates a tension between the two animals, and a stick marks the protagonist's future trajectory. The actual "runway" will be fairly free of stones to add to the effect.
 The finished drawing is 10" x 15", one-half the dimensions of the finished painting. The drawing is Xeroxed at 200%, and traced onto a 20" x 30" sheet of Strathmore cold-pressed illustration board. I use a fine red ball-point pen to do the tracing, so I can tell where I've been. In this photo, the seams of four different Xerox sheets can be seen.

My approach to painting in acrylics is completely dependent on watercolor techniques. I never paint with anything thicker than ½ paint and ½ water. Logically, I use watercolor brushes: round sables and mops. My finest detail brush is a 00 rigger. My biggest brush is a 1½" squirrel mop. I prefer long-bristled brushes that I can load up with a lot of paint.
 Using the 00 riggers, I paint a detailed underpainting in raw umber. The main objective here is to establish the forms and the textures. I use a Windsor & Newton series 530. This is my primary working brush, hence the term "rigger vitae." One of them lasts an average of about four days.
 The textures of the rocks will be established later, so they are left blank. The cactus is also only described by outlines of the bodies and length and direction of some of the spines. This is because the cactus bodies will not appear in the finished painting, only the dense spines will. The main purpose of the underpainting is to serve as a roadmap so I can keep track of the shapes and textures while focussing on other matters, like lighting and color theory. The finished underpainting is tinted with glazes of thin paint. I want this piece to look hot and dry, so the tint is of earth tones composed of large quantities of cadmium orange, a very warm color.
 The colors and values of the main subject are established.
 The subject is masked off, using light card stock and liquid latex.
 I begin painting the background, putting tiny highlights on dirt granules.
 The cactus bodies are painted, using the darkest values that will appear in the finished piece. I begin to paint the darkest, least illuminated spines, and successively paint lighter and lighter spines on top of those.
 Once the background is established, I remove the mask from the subject, and begin to work on the piece as a cohesive whole.
 The shapes, textures and values are all securely on the board at this point. I continue to give depth to the piece by pushing back some parts, pulling others forward, using color temperature and value. I also continually enrich the colors with successive glazes.
 Here, the tortoise has received a rich brown glaze. The cactus is beginning to take shape as lighter-colored spines are added.
 Detail is added to the dirt to give it shape, and the same thing is done for the tortoise.

The finished piece, with such details as a gray hairstreak butterfly (Strymon sp.) and a honey ant (Myrmecocystus sp.).

 Step one is executing a drawing - something I'm not terribly skilled at. I know a number of artists who can draw something worthy of Abrecht Dürer in a few short minutes. I'm not among them. I have to plan everything out. A drawing starts with a number of little thumbnail sketches, slowly refining things until I get something I'm happy with. A tortoise is an easy animal to draw, and this drawing was simple and straightforward. With a trickier subject, it's common for me to waste half a dozen sheets of paper refining thumbnails to figure out how to draw a single element.
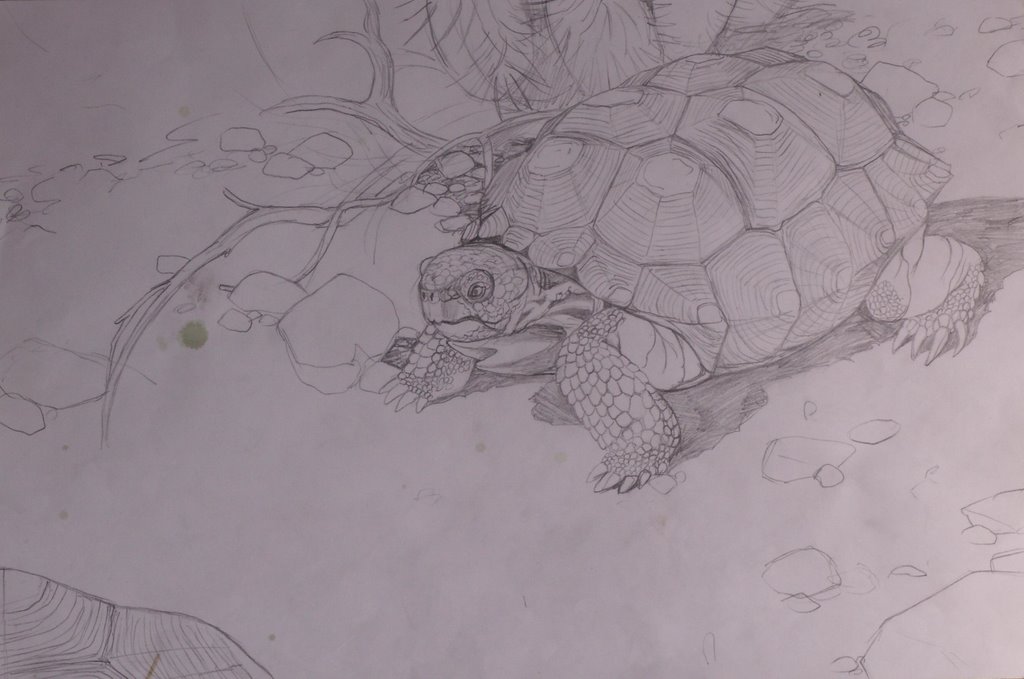 Once I've worked out how to draw the main subject, I put together a composition drawing. Here I've positioned a male Desert Tortoise preparing to charge an opponent. Our hero's head, where all the intent of the piece will lie, is centered on the page. His body occupies the upper-right quarter of the composition. A hedgehog cactus (Echinocereus sp.) behind him adds mass to that quandrant, suggesting an impending charge from the corner, diffusing that mass into the relative empty space before it. The dark carapace in the opposite corner creates a tension between the two animals, and a stick marks the protagonist's future trajectory. The actual "runway" will be fairly free of stones to add to the effect.
 The finished drawing is 10" x 15", one-half the dimensions of the finished painting. The drawing is Xeroxed at 200%, and traced onto a 20" x 30" sheet of Strathmore cold-pressed illustration board. I use a fine red ball-point pen to do the tracing, so I can tell where I've been. In this photo, the seams of four different Xerox sheets can be seen.
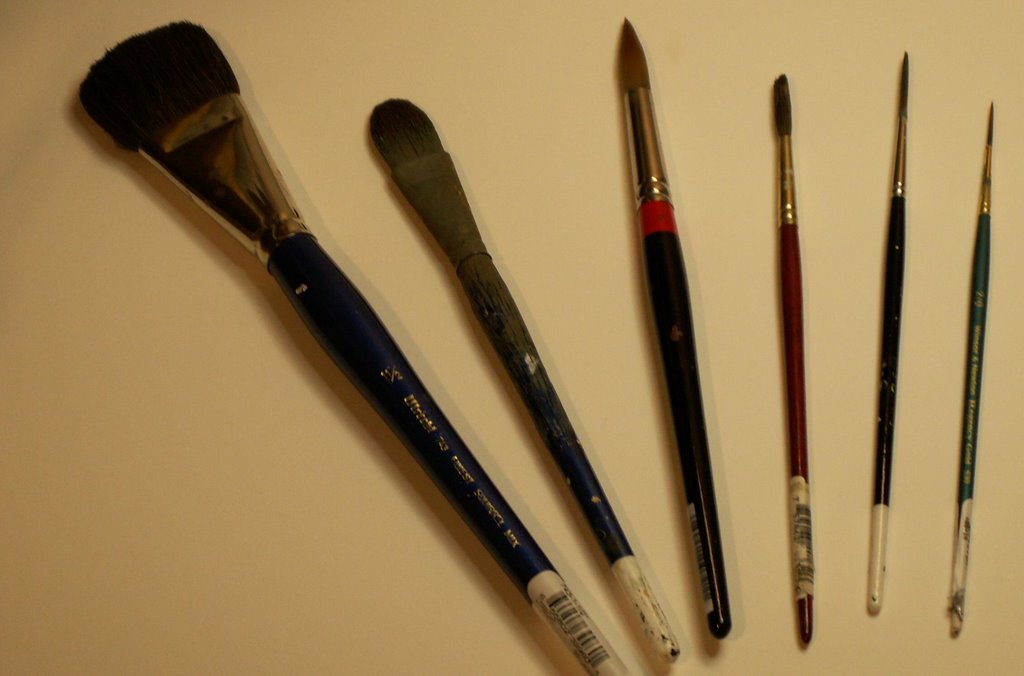
My approach to painting in acrylics is completely dependent on watercolor techniques. I never paint with anything thicker than ½ paint and ½ water. Logically, I use watercolor brushes: round sables and mops. My finest detail brush is a 00 rigger. My biggest brush is a 1½" squirrel mop. I prefer long-bristled brushes that I can load up with a lot of paint.
 Using the 00 riggers, I paint a detailed underpainting in raw umber. The main objective here is to establish the forms and the textures. I use a Windsor & Newton series 530. This is my primary working brush, hence the term "rigger vitae." One of them lasts an average of about four days.
 The textures of the rocks will be established later, so they are left blank. The cactus is also only described by outlines of the bodies and length and direction of some of the spines. This is because the cactus bodies will not appear in the finished painting, only the dense spines will. The main purpose of the underpainting is to serve as a roadmap so I can keep track of the shapes and textures while focussing on other matters, like lighting and color theory. The finished underpainting is tinted with glazes of thin paint. I want this piece to look hot and dry, so the tint is of earth tones composed of large quantities of cadmium orange, a very warm color.
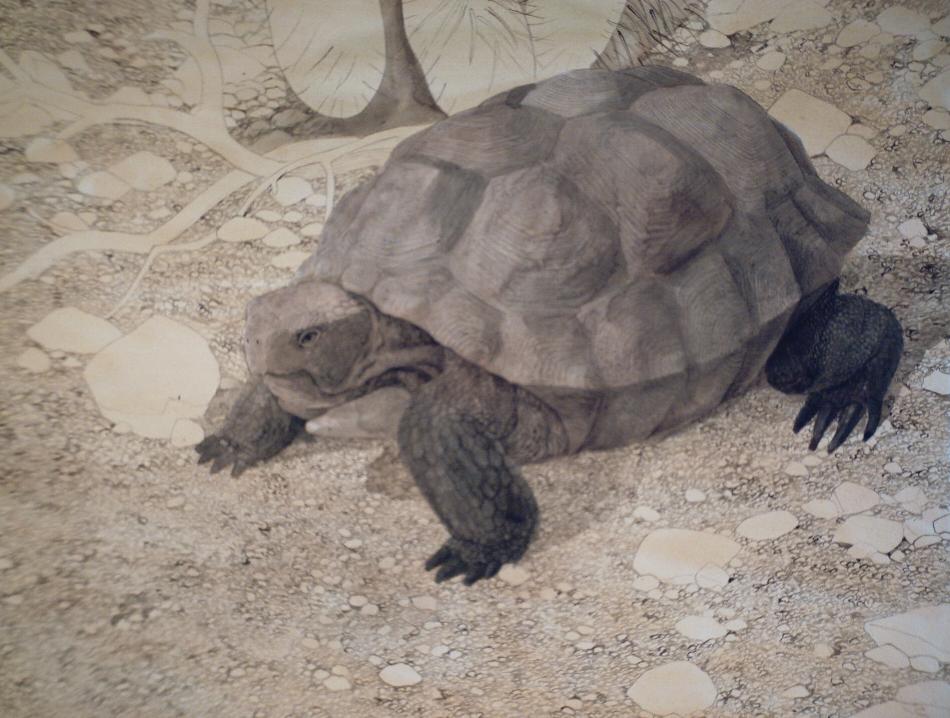 The colors and values of the main subject are established.
 The subject is masked off, using light card stock and liquid latex.
 I begin painting the background, putting tiny highlights on dirt granules.
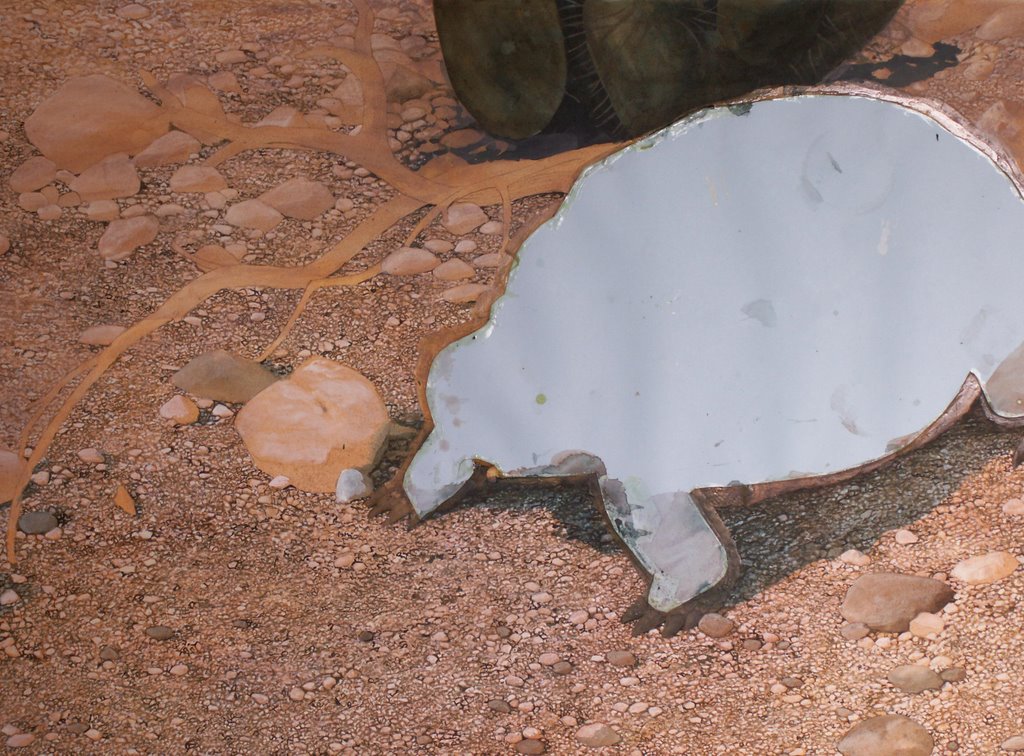 The cactus bodies are painted, using the darkest values that will appear in the finished piece. I begin to paint the darkest, least illuminated spines, and successively paint lighter and lighter spines on top of those.
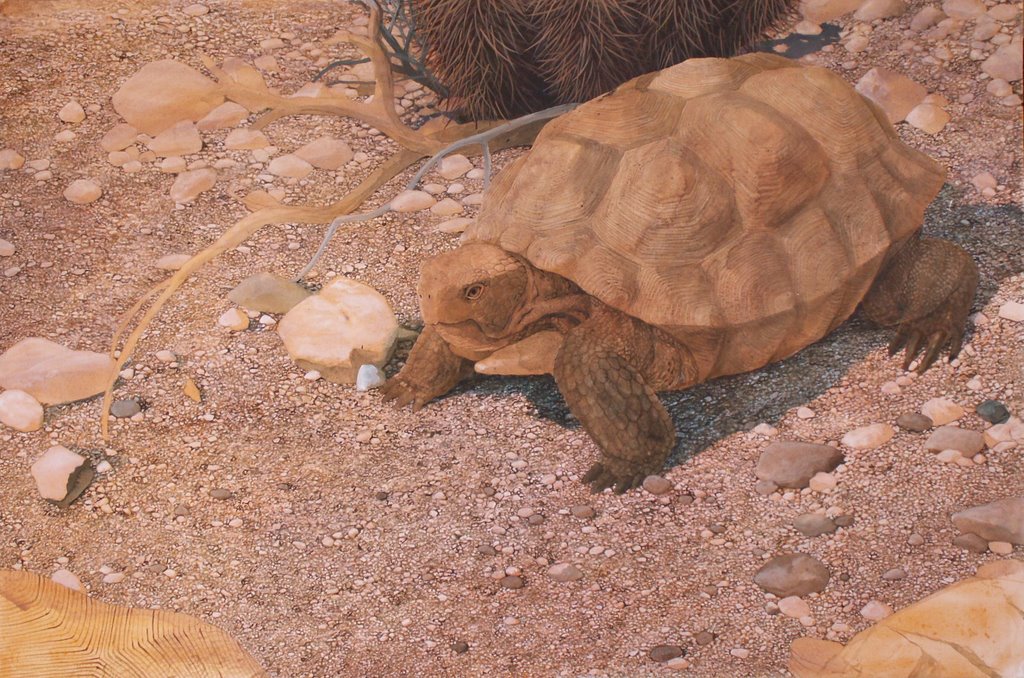 Once the background is established, I remove the mask from the subject, and begin to work on the piece as a cohesive whole.
 The shapes, textures and values are all securely on the board at this point. I continue to give depth to the piece by pushing back some parts, pulling others forward, using color temperature and value. I also continually enrich the colors with successive glazes.
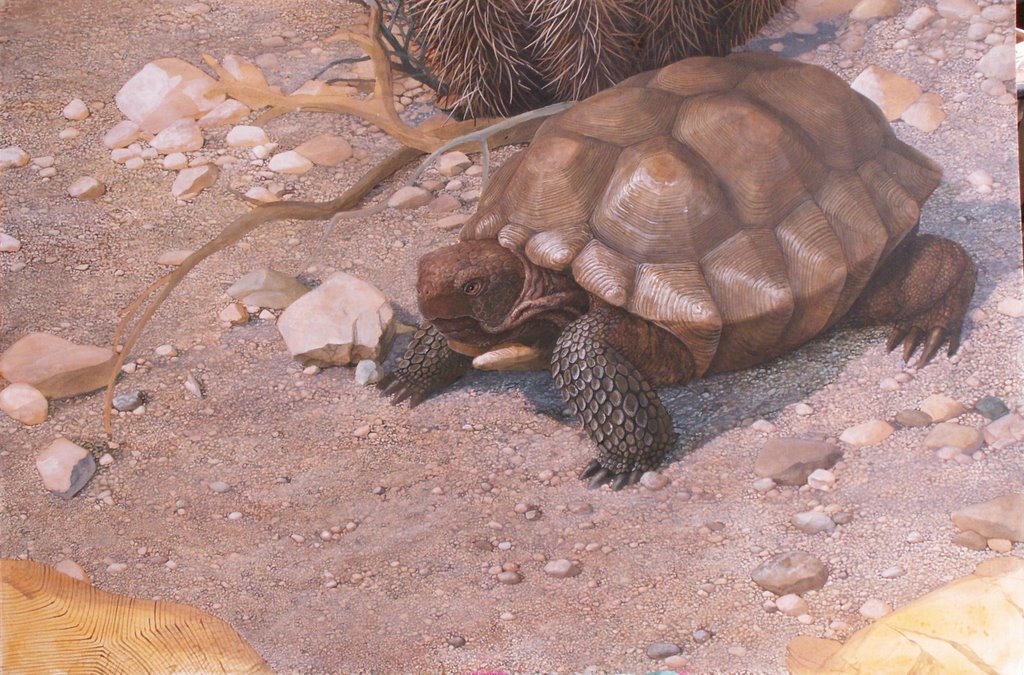 Here, the tortoise has received a rich brown glaze. The cactus is beginning to take shape as lighter-colored spines are added.
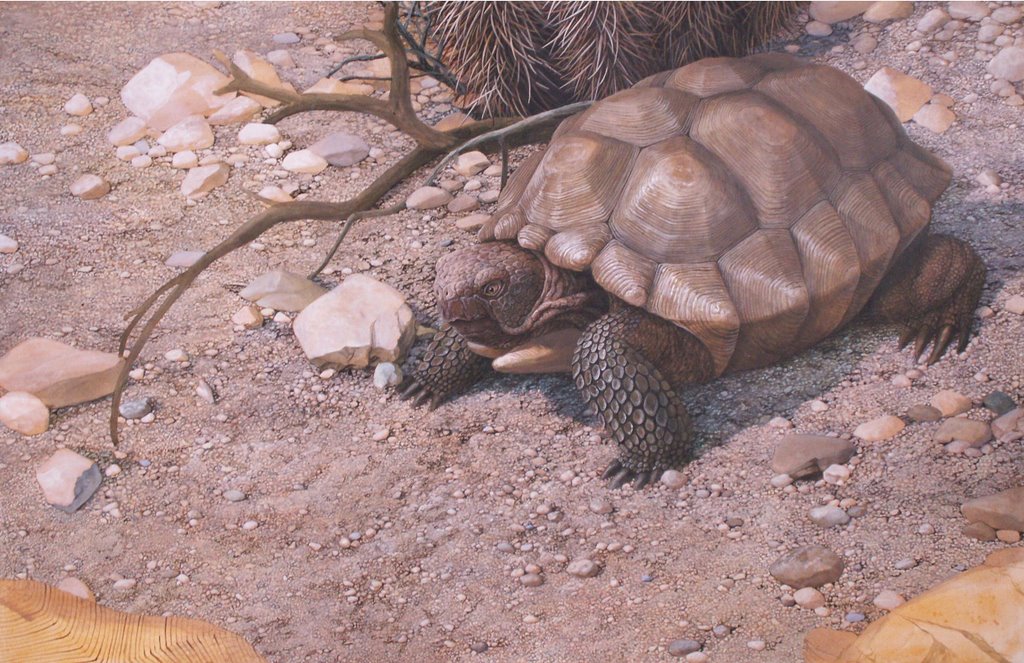 Detail is added to the dirt to give it shape, and the same thing is done for the tortoise.
The finished piece, with such details as a gray hairstreak butterfly (Strymon sp.) and a honey ant (Myrmecocystus sp.).
posted by Carel Brest van Kempen at 11:45 AM
![]()
![]()


29 Comments:
This is so enjoyable to read and view and makes me wish I was watching all of this over your shoulder. I have always wished I had such a talent. To take the beauty of nature and then add something to it.
You're an amazing artist. I really enjoyed being able to see your work from start to finish. Thank you so much for sharing that with all of us!
Excellent stuff. Did you see this news story? Clive of India's tortoise dies
This comment has been removed by a blog administrator.
Nice talent. The tortoise looks almost real.
wow!! you are a killer artist, that is an amazing work of art!!!
About your use of paper in working on a piece of art:
Nothing is wasted when it's use aids in the production of a work of art.
Thanks for all of your kind comments. Roger, I heard that story on the radio, about an hour before being re-alerted to it by your comment. Thanks for saving me the trouble of looking up an article on it.
Wonderful post. It's nice to see the steps taken in the creation of such an amazing work of art.
By the way, it REALLY impressed my 14-year-old son! Duuuude!
The desert tortoise is one of my favourite animals, so it's especially delightful for me that you chose this particular artwork to demonstrate how you produce your incredible work. Thank you for this fascinating post. Do you know when ASDM will exhibit these? We've been members since 1964. Their recent art gallery and art school have added to our increasingly love of this remarkable museum.
Thanks for this gift. Excellent work and your explanation makes me understand many things about the magic world of art.
Yes, the ASDM is a great place; I've been in love since my first visit when I was ten. The Society of Animal Artists' annual touring show just ended there last week. I'm afraid I don't know when "Vanishing Circles will be on public display--I think they're hoping to make a touring museum show of it, and maybe a book. I'll be sure to post information as it becomes available--it should be a fine collection. The tortoise is the third piece I've done for it. The first were a San Esteban Chuckwalla, the second a Giant Spotted Whiptail (I'm shaping up to be their reptile guy). Next on the list is a Mexican Beaded Lizard. The only other painting from the collection I've seen so far is a beautiful Ocelot by Colorado artist Edward Aldrich. Richard Sloan told me he did a Burrowing Owl for it, but I haven't sdeen it.
Carel - Excellent photo-essay describing your drawing and painting techniques. Your very detailed explanation down to brushes, etc.. was very generous. Thanks for taking the time and effort required to provide some insight into your methods. Your work is really quite wonderful.
Just discovered your site via Tortoise Trail...
Thank you so much for taking all the time to put this post together... It is greatly appreciated.
I'm no professional (truth is, I struggle even with stick figures), but was quite impressed by this... the artwork itself, as well as your description of the process.
Seems you're in the ideal location, too, for nature art. Beautiful terrain and wildlife.
Your artwork is AMAZING!
I wish I could paint that magnificantly.
I learn a ton from this site, thanks a lot for sharing.
That is absolutely amazing! I'm in awe of the DIRT!
I really like your works, now how can a teen make something near that with basic art stuff? I'm not being funny can someone please answer?
The same way that you get to Carnegie hall, my friend: practice, practice! I'm not being funny either; there's no way to get good at painting without a whole lot of hard work. The best advice I can give you is this: My work started to really improve once I stopped being afraid of failing. Once I decided that I didn't have a problem with spending weeks on a painting that I wasn't sure I could pull off, and might be something I wouldn't want anyone to see once it was finished, THEN I really started to improve, because when you fail in a massive way, you learn in a massive way, and that's more valuable than painting a pretty picture. Good painting to you!!
This comment has been removed by a blog administrator.
I want to see an Ankylosaurus!!!!
That was really, really good.
Thanks man, I managed to be top of the class in art. I would love to see your painting of a shark, if it is possible.
Wow, what a complexicated process! How many hours/days/weeks did it take???
Thanks to everyone who voiced their approval of this post. In the future I'll post some similar pieces covering other aspects of the craft.
Radar: I've never painted an Ankylosaurus, but it would be fun. I'll let you know if I ever paint one. The closest thing I've done was a nodosaur being attacked by a pack of Utahraptor, that I did for Frank DeCourten's Dinosaurs of Utah.
Hamzah: Congratulations! I've also never painted a shark, but check out the piece my friend Mark Kelso did here.
Derek: About five 40-hour weeks.
Man, he sure did a good shark, I know people that do art on thier computers, does that define into 'Modern Art'?
That shark painting of Mark's is an oil painting done without computers, with nothing but old fashioned paint, canvas and brushes, photographic aids and the artist's skills and knowledge. I would categorize it as photo-realism and hope Mark would agree.
Good Job! :)
Hrmm that was weird, my comment got eaten. Anyway I wanted to say that it's nice to know that someone else also mentioned this as I had trouble finding the same info elsewhere. This was the first place that told me the answer. Thanks. 338A Bola Tangkas
Post a Comment
<< Home